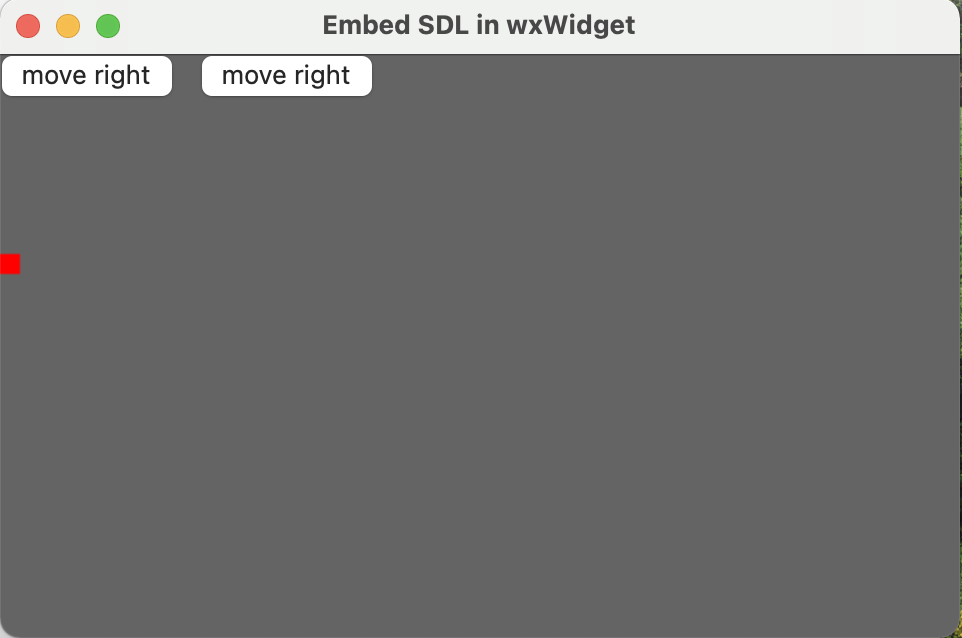
本文介绍了如何在wxWidget库里面使用SDL绘制东西。
首先我们给一个基本的wxWidget3的窗体程序:
 1
 2
 3
 4
 5
 6
 7
 8
 9
10
11
12
13
14
15
16
17
18
19
20
21
22
23
24
25
26
27
28
29
30
31
32
33
34
35
36
37
| #include "SDL.h"
#include <wx/wxprec.h>
#ifndef WX_PRECOMP
#include <wx/wx.h>
#endif
constexpr int WindowWidth = 480;
constexpr int WindowHeight = 320;
class MyCanva: public wxPanel {
public:
MyCanva(wxFrame* parent): wxPanel(parent) {
}
};
class MyFrame: public wxFrame {
public:
MyFrame(): wxFrame(nullptr, wxID_ANY, "Embed SDL in wxWidget", wxDefaultPosition, wxSize(WindowWidth, WindowHeight)) {
MyCanva* canva = new MyCanva(this);
}
};
class MyApp: public wxApp {
public:
bool OnInit() override {
MyFrame* window = new MyFrame;
window->Show();
return true;
}
int OnExit() override {
return 0;
}
};
wxIMPLEMENT_APP(MyApp);
|
运行之后应该会显示一个窗体。
这个窗体是在MyApp里面使用了MyFrame,然后在MyFrame中放了一个MyCanva。
之所以放MyCanva是因为wxPanel可以自动绘制,而wxFrame不能自动调用OnPaint方法。
然后我们要初始化SDL,在MyFrame的构造函数中:
1
2
3
4
5
6
| bool OnInit() override {
SDL_Init(SDL_INIT_EVERYTHING);
MyFrame* window = new MyFrame;
window->Show();
return true;
}
|
接下来我们需要将MyCanva的窗口数据给SDL,让SDL管理他的数据,这样我们才能让SDL进行绘制:
 1
 2
 3
 4
 5
 6
 7
 8
 9
10
11
12
| MyCanva(wxFrame* parent): wxPanel(parent) {
sdl_window = SDL_CreateWindowFrom(GetHandle());
if (!sdl_window) {
wxLogMessage("SDL window create failed: %s", SDL_GetError());
} else {
renderer = SDL_CreateRenderer(sdl_window, -1, 0);
if (!renderer) {
wxLogMessage("SDL renderer create failed: %s", SDL_GetError());
}
SDL_SetRenderDrawBlendMode(renderer, SDL_BLENDMODE_BLEND);
}
}
|
这里主要使用了SDL_CreateWindowFrom方法从MyCanva已经创建好的窗体中拿到数据。
注意:sdl_window和renderer是全局变量。
接下来我们要使用SDL在MyCanva上进行绘制,只需要在其OnPaint事件中绘制即可:
1
2
3
4
5
6
7
| void OnPaint(wxPaintEvent& event) {
SDL_SetRenderDrawColor(renderer, 100, 100, 100, 255);
SDL_RenderClear(renderer);
SDL_SetRenderDrawColor(renderer, 255, 0, 0, 255);
SDL_RenderFillRect(renderer, &rect);
SDL_RenderPresent(renderer);
}
|
这里rect也是全局变量(SDL_Rect类型)。不要把其移动到MyCanva的public部分,然后在下文的按钮事件中使用类似canva->rect.x = xxx;的代码,这样会产生总线错误(但应该可以使用wxWidget在控件之间共享变量的方法,不过这方面我没接触过)。
然后我们注册这个函数到OnPaint事件:
1
2
3
4
| MyCanva(wxFrame* parent): wxPanel(parent) {
Bind(wxEVT_PAINT, &MyCanva::OnPaint, this);
// ...
|
完成之后你应该会在屏幕中看到一个红色方块。
OnPaint事件只会在特定的情况下调用(比如窗口打开时,被遮挡时和缩放时等),如果你想要编写游戏,需要让其按照某一间隔进行不停地绘制,这里我们可以使用定时器事件做到这一点:
 1
 2
 3
 4
 5
 6
 7
 8
 9
10
11
12
13
14
15
16
17
18
| // 在MyCanva类中
// 将要绑定到定时器事件的函数,Refresh用于强制触发一次OnPaint事件
void OnTimer(wxTimerEvent& event) {
Refresh();
}
MyCanva(wxFrame* parent): wxPanel(parent) {
Bind(wxEVT_PAINT, &MyCanva::OnPaint, this);
// 绑定函数到定时器事件
Bind(wxEVT_TIMER, &MyCanva::OnTimer, this);
// 创建定时器
wxTimer* timer = new wxTimer(this);
// 开启定时器,以30毫秒为间隔
timer->Start(30);
// ...
}
|
我们的MyCanva现在可以视为一个纯纯的SDL窗口,接下来我们在窗体中增加两个按钮left和right,点击left小方块会向左移动,点击right小方块会向右移动。
我们需要在MyFrame中增加,不要在MyCanva中增加。因为按钮也是绘制上去的,现在我们的MyCanva已经被SDL管控,绘制上去的按钮会被SDL的绘制覆盖掉。
而MyFrame和MyCanva不在一个层,wxWidget会帮我们正确地绘制按钮。
 1
 2
 3
 4
 5
 6
 7
 8
 9
10
11
12
13
14
15
16
17
18
19
20
21
| class MyFrame: public wxFrame {
public:
MyFrame(): wxFrame(nullptr, wxID_ANY, "Embed SDL in wxWidget", wxDefaultPosition, wxSize(WindowWidth, WindowHeight)) {
MyCanva* canva = new MyCanva(this);
wxButton* button1 = new wxButton(this, ID_LeftBtn, "move right", wxPoint(0, 0));
Bind(wxEVT_BUTTON, [&](wxCommandEvent& e){
rect.x -= 10;
}, ID_LeftBtn);
wxButton* button2 = new wxButton(this, ID_RightBtn, "move right", wxPoint(100, 0));
Bind(wxEVT_BUTTON, [&](wxCommandEvent& e){
rect.x += 10;
}, ID_RightBtn);
}
private:
enum {
ID_LeftBtn = 1,
ID_RightBtn,
};
};
|
结果如下:

因为一开始我们使用SDL_CreateWindowFrom函数获得了窗口的数据,但这时窗口数据同时被wxWidget和SDL所拥有,这意味着当程序退出时,SDL和wxWidget会将这同一个窗口销毁两次,从而产生段错。
我的解决方法是不添加SDL_Quit这样SDL就不回去销毁窗口。但我不知道会不会因此导致SDL的其他部分内存泄漏。
完整的代码在这里
如何在wxWidgets窗口内嵌入SDL窗口_viking_xie的博客-CSDN博客
